Showing posts with label Demo. Show all posts

12/11/14

Full Bathroom Reno: Mirrors, Vanity, and Moving More Pipes

We left off with all new electrical in the bathroom, and a vent pipe moved. The vent pipe had to be moved for the electrical, so the new vanity light could go where it needed to go to be centered. You can see the newly moved black vent pipe and the new light locations below. The light on the left has a new fixture already installed, and the one on the right doesn't. It simply has the bracket and mounting hardware, since we knew we would have to remove the light again as soon as we put up sheetrock. The one on the left is installed temporarily so we had some sort of light while we worked.


Although we were thankful to have all of these problems solved, a new problem was discovered. Unless we seriously rerouted some pipes, we could not have the mirrored medicine cabinets I picked out. After much discussion, we opted to leave the pipes as they were, and purchase a new vanity that would be configured to double sinks for better storage, and use flat mirrors without medicine cabinets.

I was honestly not pleased at all about that at first. I thought our vanity was fine, and it was a shame to buy a new one. But, we forged on and shopped around and purchased a shiny new vanity online, and had it shipped to our local store. The vanity has drawers in the middle and cabinets on the outside, so it is better suited for double sinks.

When we got the vanity in, we placed it in the bathroom just to see, and it was stunning. I withdraw any negative thoughts or comments I had on purchasing a new vanity because it is a million times nicer than what was in there. The craftsmanship is stunning, it's professionally finished, the layout is better, and it even has soft close drawers. My favorite feature might be all of the trim and molding- it looks more like a furniture piece. I'll show that soon.

Unfortunately, it presented a new problem. I'm learning that in (major) DIY, things almost never go as you planned. The new problem was that now there were different pipes that needed to be moved. The drain pipe and water pipe both intersected with the drawers in the new vanity.


In the photos you can see that the two pipes on the left interfere with the drawer area. When we purchased the piece, we thought there would be enough room behind the drawers, but there just isn't.

Due to being in a rush to complete the bathroom, mostly due to our baby on the way, Jake suggested just hiring a plumber to move the pipes. I called over 14 plumbers and contractors, and no one could get it done. That is a story for another day, but I can simply say, I am incredibly disappointed so far with my personal experience with contractors/plumbers.

Even though these particular plumbing issues were things Jake had never dealt with before, he decided to attempt it after our negative experience with contractors/plumbers. As I mentioned in my 29 Thoughts on Thankfulness post, this is one of the things I love most about him. He can literally do anything that he puts his mind to. Anything. He will work hard and figure it out. And, the proof is in the pudding! It took him a couple of nights but he got the pipes moved. The time he spent was only an hour or so, but the pipes were so old that it took several soaking sessions with WD40.


You can see in the photos the pipe to the far left was routed to go straight out, and the middle pipe was rotated to also go straight out. With these changes, our vanity now works in place! Next up, drywall.

12/10/14

Full Bathroom Reno: Electrical, Vanity, and Moving a Vent Pipe

As I mentioned in the last bathroom post, I didn't get detailed photos of all of the steps due to baby on the way. A lot of these steps were taken when I still was not feeling well, so my thought process was not on taking photos and documenting!

Once we decided to remove the mirrors, Jake asked his brother-in-law to help. His brother in law works in glass and mirrors, so he would be able to remove it much safer than we could. He came over and removed them pretty quickly, and we were left with a very ugly wall. I wish I had pictures of the wall at this point, but imagine it with huge 5 inch diameter glue spots and chunks of drywall missing. We also discovered that there used to be two medicine cabinets, one in the middle and one on the left side wall, as there were holes for them in the drywall.

At this point, the only option was to completely remove the existing drywall and replace it. It was just too damaged. On the bright side, this meant it would be a lot easier to install new electrical. I asked my dad to help with the electrical, since Jake nor I had done it before, and he was very experienced.

He came over and installed two new outlet boxes, quadrupling our number of outlets in the bathroom. We had just one single outlet with two plugs, and he had the brilliant idea of making each outlet four plugs, in addition to adding the new outlet box. I was so excited I was jumping around with glee! He also replaced our vent fan, which has never worked since we moved in. It worked, I suppose, but it made this horrendous noise when you turned it on, so we just never used it. He also updated the light switch and vent fan switch to more modern rocker switches. I have a difficult time saying what I was most excited about- probably all of it. I switched the vent fan on and off for days just to listen to the quiet hum. Also, now all of our outlets were a new, crisp, clean white, as opposed to the older almond color.

The next step was to convert the single vanity light into a double vanity light, which had it's own set of problems. As with all DIY projects, you never know what's lurking behind the walls. In this case, we had a vent pipe in the way.

 
In the photo above, the black vent pipe had already been moved. The issue was the vent pipe came straight down where the arrow points, instead of curving to the left. Jake and my dad managed to move the pipe over one stud, to allow for the vanity light to be centered.
 
The processed described in this post took a few different days to complete, but boy is it all worth it!

5/21/14

Full Bathroom Reno Day 3: How to Install Water Cutoff Valves and Replace Rotten Studs

The bathroom reno is moving right along! On day 3 of our renovation the first thing Jake did was install new cutoff valves for the pipes to the shower/bathtub.

how to install new water cutoff valves
 
This was a major success because this meant no more leaks! The coral buckets were no more. Remember me saying that in order to work on the pipes, we had to shut off the well and the entire water supply? That was because none of our pipes or plumbing had cutoff valves to simply shut off the water in certain locations. Also, in doing this, he fixed the leak.
 
The next thing he went to work on was fitting the tub/shower rough valve.
 
instal shower tub rough valve
 
To do this he used primer and PVC glue on both edges of the PVC pipe to secure it.
 
use primer and pvc glue for pvc pipe

prime and glue pvc shower pipe
 
install new cutoff valves in shower

prime and glue pvc pipe

how to line up pvc for valve

 
Then, my dad came over to take a look and see were we were at, and to help out of course. My dad is amazing- he can fix anything. Every single time we've had something break or go wrong in our house and we didn't know what to do, I called my dad. He has been able to walk us through or help with every problem we've encountered.
 
dad hunt and home
 
He looked at some of our studs, because we weren't sure if they needed to come out or not. The sheetrock we tore out had some mold on it and was soft, and two of our bottom baseboards were rotten. He said they definitely needed to come out and be replaced, and they worked on removing them together. While they were at it, they sent me out for a shop-vac, which is my new best friend.
 
new shop vac
 
 
This thing is incredible! Since we've had it, not only have we used it in the bathroom but I have vacuumed every floor in the house with it. The suction is unbelievable. Anyway, Jake took out the old studs by slicing them with a saw and pulling them out piece by piece. Then he went through and pulled out any remaining nails and scraped the floor to get it even.
 
how to replace rotten studs

how to replace rotten studs
 
I had purchased pressure treated 2x4s earlier just in case, and Jake cut them to size.
 
pressure treated 2x4s new studs
 
At this point, Jake's brother-in-law came over and helped move the new studs back into place. It sounded pretty difficult, due to the tight fit, but they got it done!
 
how to replace rotten studs

how to replace rotten studs
 
 I was very excited to have all of the problems fixed! Now we're able to start building from a new, blank, clean slate.
 
how to replace rotten studs
 
 Another day down, several more to go! I'm excited to see what this brings us.

5/19/14

Full Bathroom Demo Day 2: How to Demo and Remove Jacuzzi Tub

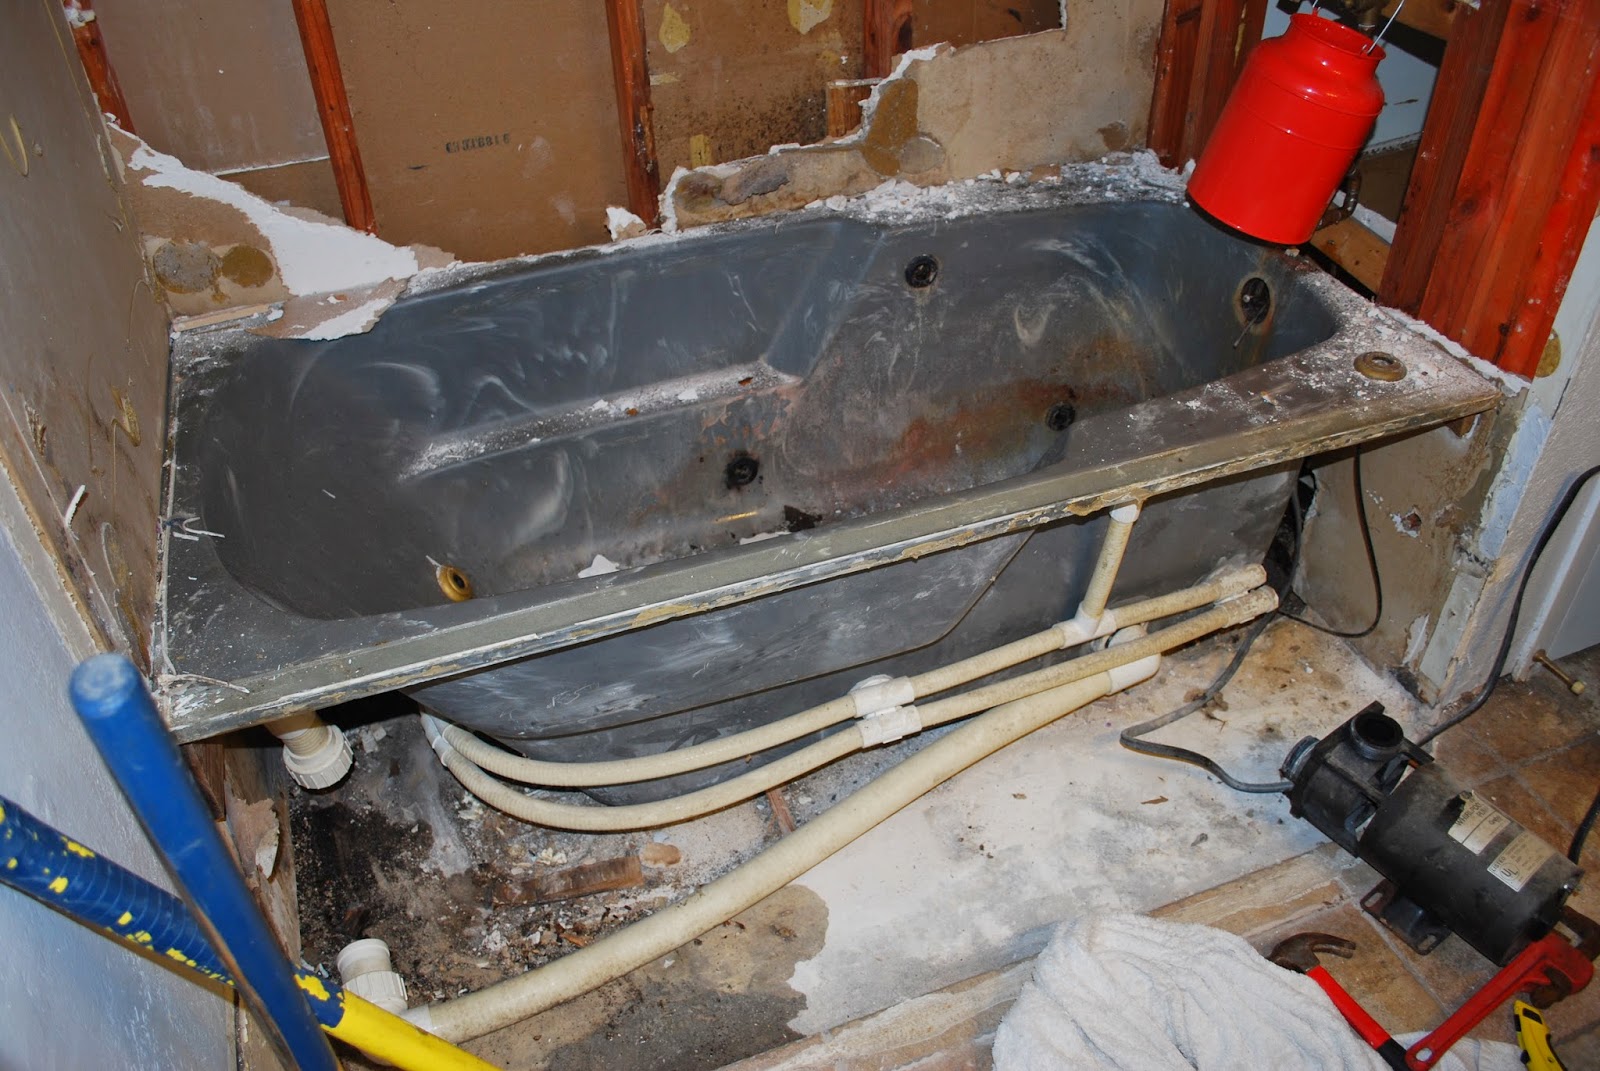
After our very successful first day of demo, we started on day two. Neither one of us was really sure how to go about getting this enormous bathtub out of the bathroom. With the step and surrounding walls gone, Jake took a look the underneath. The first thing he did was locate the Jacuzzi pump and disconnect it from the surrounding pipes.
 

demo jacuzzi tub

demo jacuzzi tub

remove jacuzzi pump


remove jacuzzi pump
The empty space between the two white pipes is where the pump was located. 

remove jacuzzi pump
 
From there, we knew we had to get the tub out, but we were worried about damaging the drain and lifting it out, so back to Google we went. First Jake had to hydrate, though! 
 
jake hunt and homejake hunt and home

Jake found a video that explained removing tubs, and when the people in the video threw their bathtub into a dumpster, it shattered into pieces. Jake asked why not just use a sledgehammer and break it into pieces while still in the bathroom, and just carry it out in pieces? We decided as long as we were careful, it couldn't hurt. We weren't going to save the tub, anyway.

We went back to the bathroom and I asked Jake to give me his best lumberjack pose. In hindsight it's funny to think that at this time I thought bathtub sledgehammer-ing=chopping wood, but I figure swinging a sledgehammer and swinging an ax, close enough. Haha.
 
jake hunt and home
 
And with that, he took the first swing!

sledgehammer demo jacuzzi tub

I was pretty fascinated watching him work. On one hand I felt pretty silly standing there snapping pictures, but I was so enthralled by it all I couldn't help myself. The tub keep falling apart piece by piece. And while Jake made it look easy, this tub was solid concrete with some kind of coating. I even asked if I could try, and it was way harder than it looked. I was pretty proud of myself for knocking off two small pieces with a lot of effort, while not damaging the walls. He did the entire tub.
 
demo jacuzzi tub

sledgehammer demo jacuzzi tub
 
When it got loose enough to wiggle around, he pulled it out from the wall while I held the pipes to make sure they wouldn't get damaged.

remove jacuzzi tub

remove jacuzzi tub
 Picture from inside the linen closet, where I was holding the pipe.
 
Jake continued breaking it up piece by piece, and I carried out the bigger pieces one by one. For the smaller pieces, I found boxes around the house and filled them with the smaller tub remnants and carried those out. When we all of the tub walls were removed, leaving the bottom of the tub, we swept it out and carried that out together. It was strangely liberating to see that tub we hated go out piece by piece.
 
demo jacuzzi bathtub

demo jacuzzi bathtub

demo jacuzzi bathtub
 
 
Once again, we found more surprises. I freaked out at first because I saw some kind of centipede/bug/thing. I asked Jake if it was real and he said no, it was rubber. He went through the rubble on the ground and found several more. The only thing we could think of was either a) they were kids bath time toys that somehow (??) fell through, or b) the person who installed it thought it would be a funny joke. I have no idea. All I know is that I was pretty thoroughly grossed out, even if they were fake.
 

demo bathtub

After all the pieces were cleared out, we swept it all up.

how to demo bathtub

how to demo bathtub
 
Two days in, the demo is done! Now on to repairing and rebuilding. Pretty far off from where we started yesterday, right?
 

demo shower and bathtubdemo shower and bathtub

5/16/14

Full Bathroom Demo Day 1: How to Demo Shower Enclosure and Granite/Tile Step

We started demo in the full bathroom the other night. I had just made dinner (stuffed peppers-yum!) and Jake announced he thought that night was the night to start work in the bathroom. I said I didn't want to, as I wasn't feeling very well, but he said I didn't have to do anything. By the time I washed the two pans I used, he was asking me to open the door- he had a shower door in his hands ready to carry out. I was so excited- I ran outside and took a picture of the shower doors to send to friends and family!

how to remove shower doors


Here's how it went down. First, Jake started by taking off the shower doors. He took them off the sliding hardware one by one and carried them out. Then he sliced the caulk with a razor blade (utility knife) and took off the metal hardware pieces that supported the doors. Then, he started on what started it all- the shower head and faucet. We turned off the water and drained our well. Since we are on well water, not city water, that part is pretty different. The actual shower head piece came off just by screwing it off, but the arm wasn't so easy. It took some Googling and quite a few tries but he got it off eventually by screwing it off as well. Then he removed the faucet and handle. We were pretty disgusted when we looked at the underneath side of the showerhead- ignorance can be bliss, I guess.

how to remove showerheaddemo shower walls


remove shower tub faucet
 The culprit.

Next, he started on the shower surround. He used the same method and took it off one large sheet at a time.
 
remove shower walls
 
how to remove old shower
 

The pipes for the faucet were still leaking, so we had to hang a bucket off of each to catch the water. Those cute decorative coral milk jugs came in handy after all! Behind the shower surround, unfortunately, the sheetrock had mold and mildew on two of the three walls. He removed it with a crow bar, hammer, and brute strength. Well, brute strength on some parts- some parts were so soft they just crumbled off. Now we're down to the studs, on two walls, good (we think) sheetrock on the back wall, and the tub and what was behind it.

how to demo moldy sheetrock

Then, he started on the step into the tub. There were two granite pieces, one against the tub and one that you step on. He sliced all around the edges to loosen it, and removed it as well with a hammer and crow bar. That really took some strength! That granite piece was really well adhered, and that granite was heavy!

how to remove step shower


remove granite step bathtub


The outside of the step was tiled with the same time as our floor, and I wanted to try and save it if possible. With the step gone, we would be exposing more floor space that may or may not be tiled. If it wasn't tiled, we would need to tile that newly exposed floor to match the existing tile. The existing floor tile in there is good, and matches the tile in the rest of our house- including the two entries, kitchen, dining room, and hallway. The previous owners left a few squares of tile, but we knew it wouldn't be enough. I hoped if we could salvage these pieces, we might have enough combined to use for the floor. Jake used a screwdriver and hammer to carefully knock the grout out between the tiles. (Hey, use what you have!) I held the face of the tile to keep it from falling down and breaking. Thankfully, the tiles easily came off in whole pieces, undamaged. Victory- we could reuse those tiles.

remove granite step


Shockingly- maybe not? We've found some interesting fixes in this house. The wood under the granite was sign board. You know- the signs on the side of the street that home builders use to advertise new homes? "Builder name- starting from the $120s." That kind of sign board. Jake removed the screws with his drill and took it out piece by piece. He followed the same method with the 2x4s supporting the step. My job during all of this time? Carry out the small pieces. Haha. And cheerlead.

remove tile step
 
It was a good thing we saved that tile; under the step was bare concrete.
 
remove step into shower


demo shower


demo black mold sheetrock


remove old shower
The happy wreckage. 

demo shower
View from the mirror- trying to capture it all in our small bathroom!

I was incredibly impressed with Jake during all of this. He really is handy! This is the first demo we have done in the house, and it was amazing to watch him work. He was very fast. It probably took about three and a half or four hours to do all of that. It was really fun watching it all happen. The most fun might have been when the step was gone; it was pretty amazing how much floor space that cleared up. I knew it would in theory, but seeing it in real life was pretty great. This bathroom is our only full bath, and it's the one we both get ready in. It can be a tight squeeze when we are both in there at the same time. With that step in, if one of us had to go behind the other to get by, one would have to get against the counter and the other would kind of brush the other when he walked by. With that step out, you can easily pass the other with no issue. So much room for activities! (Step Brothers, anyone?)

All in all, day one done. I'm pretty excited to see where it goes from here.